 
															Being told an edible seed is healthy for you and actually finding it at your local grocery store is a true blessing. The next time is figuring out how to add it to your diet or menu plan. In this blog post, I share a super easy ‘Ready Set Go Smoothie Recipe using flaxseed.
Ready Set Go Smoothie Recipe Video
I’ve been throwing a tablespoon of flaxseed and other good ingredients into my smoothies randomly for a few months. After finally doing some research on how to use flaxseed I felt so much better about this recipe. In this video, I share my favorite morning smoothie before heading out to my daily workout. This is truly an awesome way to begin a healthy living lifestyle.
This video is on my Bren Haas YouTube Page.
Ready Set Go Smoothie Recipe
Don’t be afraid to use frozen blueberries if you don’t have fresh on hand. For the record I am much better at growing my own figs.
 
															Ready Set Go Smoothie Recipe
Ingredients
- 1 frozen banana
- 1/4 cup of frozen blueberries
- 10 pistachio nuts
- 1 dried California fig
- 1 tablespoon of flax seed – ground
- 1/2 tablespoon of chai seed
- 1 scoop of whey protein mix
- 6 oz of original almond milk
Instructions
- Add to the blender and mix up on smoothie mood. I use a Ninja Blender for this recipe . Any high power mixer will do great.
Recipe and Images by Bren Haas
Flax Seed in Your Daily Diet
Have you noticed more healthy seeds at local grocery stores? I am a huge fan of this crunchy peanut butter at my local Aldi. When they stopped carrying it I simply made my own. I will have to share that recipe at another time.
Below are a few facts about Flax Seed
- Flaxseed has been known to prevent hot flashes according to the Society for Integrative Oncology.
- The latest research shows that flaxseed can help lower the risk of diabetes, cancer, and heart disease most likely because it is a great source of healthy fat, antioxidants, and fiber.
- American Society of Clinical Oncology (ASCO) revealed recently discussed that consuming flaxseed can stop prostate cancer tumors from growing. The lead investigator of the study, Dr Wendy Demark-Wahnefried shared at this event that they were excited that this study showed that flaxseed is safe and associated with a protective effect on prostate cancer.
- Iowa State University’s Nutrition and Wellness Research Center recently found that cholesterol levels lowered among men who included flaxseed in their diet. Lead Author, Suzanne Hendrich shared “people who can’t take something like Lipitor, this could at least give you some of that cholesterol-lowering benefit.”
- According to a study published in Nutrition Research consuming flaxseed every day will improve your blood sugar.
 
															I was so excited I shared this new product on my Facebook Page!
Photos From The Kitchen
 
															More Healthy Living Posts

Spinach, Avocado and Egg Sandwich Recipe
Once you have had one of these delicious sandwiches you won’t believe all the goodness packed in it. In this post I share my version of the spinach avocado egg sandwich recipe I originally had at a Panera Bread Store. I share how to grow your own spinach and a few tips on enjoying your own avocado tree. Spinach, Avocado and Egg Breakfast Sandwich Recipe Flat Bread Used in Photo Above For this recipe we keep it simple and clean. No one wants to fuss over breakfast first thing in the morning. The biggest challenge with creating this treat was finding the perfect avocado. Luckily, over the past few months I have been able to find this new variety of Hass Avocado that is sold in bags at my grocery store for a reasonable price. These avocados are about 1/2 the size of the regular avocado. The texture and flavor is smooth like butter. Below is the list of ingredients you will need. 2 slices of whole oat bread (I get mine at Aldi) 1 small ripe avocado tomato slices fried or pouch egg small handful of home grown spinach salt and pepper to taste It is super easy to put this sandwich together. My spinach is harvest fresh right outside my backdoor. I keep thinking about doing a video in the kitchen to show you just how easy it is but I am super hungry in the morning and want to eat and not make videos! Let me know if you are interested in seeing a video of this and I’ll do my best. NOW… on to the directions: Toast the bread slices so they are nice and crunchy. Open up the fresh avocado and spread on the toast. Layer freshly harvest spinach on the avocado followed by tomato slices. Set aside while preparing the egg. It is easy to fry up the egg so that the egg yoke is not runny in a nonstick pan. This takes about 3-4 minutes. Once the egg is cooked put it on top of the spinach. Layer tomato slice on top and close up the sandwich with second toast after adding salt and pepper. ENJOY! Spinach, Avocado and Egg Breakfast Sandwich Printable Recipe In the photo above I use an english muffin for this recipe. Below is the printable recipe card featuring this recipe. You can find other printable recipes on my website by following this link. Recipe Card Spinach, Avocado and Egg Sandwich Recipe Ingredients 2 slices of whole oat bread (I get mine at Aldi) 1 small ripe avocado tomato slices fried or pouch egg small handful of home grown spinach salt and pepper to taste Instructions Toast the bread slices so they are nice and crunchy. Open up the fresh avocado and spread on the toast. Layer freshly harvest spinach on the avocado followed by tomato slices. Set aside while preparing the egg. It is easy to fry up the egg so that the egg yoke is not runny in a nonstick pan. This takes about 3-4 minutes. Once the egg is cooked put it on top of the spinach. Layer tomato slice on top and close up the sandwich with second toast after adding salt and pepper. More Sandwich Recipes on My Site One of my favorite quick meals to go is a sandwich. We get pretty creative with what we use to make the sandwich so be sure to check out my post features on this website. Thank you for stopping by My Site Today! Let’s Connect What do you think of this recipe and using avocado, spinach together? I would love to hear what you think of my Spinach, Avocado and Egg Breakfast Sandwich Recipe. Don’t be shy and comment on this blog post or reach out to me on my website contact page. Happy Sandwich Making,

Traditional and Super Healthy Cabbage Soup Recipe
The first time I had cabbage soup was when I was in college and a friend of mine introduced me to this new diet. You can eat as much as you want … well… as long as you don’t mind all the high fiber and are able to watch the sodium. Today I share a few tips on making a delicious and truly healthy Cabbage Soup Recipe. Cabbage Soup Recipe Additions For this recipe, I am showcasing today you will need the following ingredients. Be sure to make sure you are only using fresh vegetables. I will add notes on additional herbs and vegetables you may want to consider in this post as well. Today I am throwing in some Rotisserie Chicken that I have on hand. Ingredients Below you will find a simple list of ingredients used to make this soup I am featuring in today’s post. A detailed and printable recipe is featured on this post today so scroll down for details. INGREDIENTS Olive Oil Large Sweet Onion Carrots Celery Red Peppers Green Beans ( fresh or frozen) Chili Powder Pepper and Salt (to taste) Garlic Thyme Leaves ( or dried) Chicken or Vegetable Broth (I am using Chicken because of the meat option below) Water Cabbage Can of Fire Roasted Tomatoes Red Pepper Flakes Fresh Parsley Chopped Rotisserie Chicken ( because I had it on hand) How to Make Cabbage Soup in an Instant Pot The printable recipe card below is using a dutch oven on the stovetop. I love using my electric pressure cooker or instant pot so here are the directions for that option. You can find the XL Power Pressure Cooker I recommend in my Bren Haas Shop here on my website. I have only seen this product on Amazon. Set Instant Pot to “saute” setting ( or in Electric Pressure Cooker set to ‘Chicken’ ) and saute the onion, celery, and carrot for a few minutes, then garlic for 1 minute. Set to “Off” setting. Pour in remaining ingredients except parsley and the cooked chicken if you are using that ingredient. Secure lid and set valve to sealing position. Set to “manual” mode and select 15 minutes on Instant pot or in Electric Power Pressure Cooker set to ‘Soup and Stew’ for 12 Minutes. Let pressure come down naturally for 10 minutes then you can carefully quickly release any remaining pressure. Stir in parsley and chicken at this time. If using Chicken turn the Power back to saute as in step 1 so the chicken will heat up fast. https://youtu.be/FvhGmrhIK1M You all know I love creating videos to share my creative home and garden. This YouTube video can be found on my Bren Haas YouTube Channel. If you are a member of the YouTube Network please be sure to follow my channel. Super Easy Cabbage Soup It all starts with amazing ingredients. Check out my photos from the recipe below. In the video, I mention the grater which is pictured below. Every kitchen needs one of these! vegetable ingredients carrots diced cabbage soup Right as the lid was open and the steam fog removed from my camera lens.. look at all those beautiful ingredients. Cabbage Soup Printable Recipe Below is a printable card you are welcome to use as a pdf or print for your own record. I have added Chicken to mine in the photos featured on this page. PRINTABLE RECIPE Below If you enjoy this print option you can find more on my website at the link here. Don’t Miss These Other Great Soup Recipes on My Site Let’s Connect In conclusion of reading this post, I would like to hear what you think of adding Chicken to the cabbage soup. I really enjoyed it because we had it on hand and the boys aren’t super excited about only having vegetables in soup. Be sure to comment on this post and or reach out to me on social media at the links provided on this post. Happy Cabbage Soup Day,

Perfect Healthy Travel Trail Mix Recipe
In this post, I share my super easy to mix and package for travel trail mix. This recipe is fresher and cheaper to make from ingredients you handpick out at the grocery store. I hope you will print the recipe card to my Perfect Healthy Travel Trail Mix Recipe. Bren’s Health Travel Trail Mix Recipe Don’t even think about buying a premixed bag of trail mix ever again after making your own! YOU’VE BEEN WARNED! I not only have a trail mix packed in my purse when I’m running errands in town I always pack a special mix when on travel. It is good to have Nothing is worse than getting back to your hotel room late after a long day connecting with awesome folks at a travel event and your tummy is growling because you were too busy chatting and missed dinner. Today I want to share a mix I’m taking with me on my trip out west tomorrow. A really unique spin to this mix is adding dried Goji berries like the ones I grew on my patio. I hope you take advantage of the print option and add this mix to your next travel adventure to keep you energized. Mix it up and let your family go nuts! I enjoy purchasing healthy and fresh nut varieties and mixing my own. Aldi Grocery store is my go-to place for fresh nuts. I love to purchase all the varieties but my favorite is walnuts, cashews, hazelnuts, and pistachio. When I get the nuts home I put them in canning jars with a tight seal because they last longer. Buying large quantities of nuts also helps save money in the long run. Get the Printable Recipe Card Here: Travel Trail Mix Recipe Card Let’s Connect What do you mix up in your trail mix? Is there something unique that would win a contest? I’d love to connect with you so please share with me in the space below so we can connect. You are also welcome to comment on my about page to find out more about me. Happy Healthy Travels,

How to Get Started Growing Microgreens
Packed with tons of nutrients and can be used in almost any meal plan is what Microgreens are to me. In this post, I share some tips on growing Microgreens in your home and garden. You will find the podcast, resource links, and a few videos to get you started. Starting Micro Greens In the video below I am using a recycled container from tomatoes I purchased at Costco. I am the plastic produce container HOARDER!!! I can’t help myself because they make amazing little greenhouses. These are great craft ideas for kids who are homeschooled and anyone wanting to dabble in growing things. Stay tuned by subscribing to my blog or YouTube to see these babies grow. This crop should be ready in about 7-10 days. You will Need For this project recycle any plastic see-thru container you find in the produce department. My favorites to use are the tomato packs from Costco. Below the image, I have made a list of what you need for this project. Don’t go crazy buying everything new because it is not necessary. Potting Soil – you can use a good seed starting material but I prefer using potting soil I use in my garden containers for vegetables and herbs. Purchase a large bag to use in your home garden for other projects. Larger quantities are always a better deal. Microgreen Seeds – I have purchased many different varieties from Amazon, Johnnys Seed, and Botanical Interest Seeds. Most home garden seed companies sell MICROGREEN SEEDS. Recycled Container or Microgreen Container – Clean container and get all the stickers off so light can come through. Make sure you have drainage holes in the bottom or sides. Here are the seeds I used and recommend in this video: Spicy Salad Mix Microgreens on Amazon. Resource Links Here are a few helpful links that I personally trust when it comes to growing Microgreens. I hope you will check them out and be sure to ask me more on my website or this post. Microgreens nutrient Facts: ACS.org GardenChat Facebook Group UPDATE This is a photo from day 4 as the first true leaves start to arrive. By Day 10 I was able to harvest my first patch of microgreens from this project. More About Microgreens On My Site: Recipes Be sure to check out a few of my favorite microgreen recipes here on my site. Let’s Connect Now is your chance to lay it on me. What do you think about Microgreens? Have you grown them before? I would love to hear from you so be sure to comment below with your thoughts. My readers are also invited to comment on my contact page featured on this site. Happy Microgreen Growing,

Planting Seeds with the Puppy in The Greenhouse Dome
Being a greenhouse owner means I don’t pay attention to the cold as much. Every day is a holiday in this growing space. This post I share a fun video featuring Planting Seeds with the Puppy in The Greenhouse Dome. Planting Seeds with the Puppy in The Greenhouse Dome Video My goal in 2020 is to share more V-logs daily so I hope you will subscribe to my channel on @BrenHaas YouTube and connect on my website. I just want to share how amazing it is to be alive… and live in Ohio. I am pretty random so be prepared! Below is my latest video featuring all the fun Oliver is in the greenhouse dome. What do you think of that speedy puppy? He is 14 months as of January 1 and not slowing down one bit. I’ve been lazy – mostly because of after holiday cold and sinus bug. Funny how in the dome garden my ear is suddenly starting to feel better. Must be all that amazing sunshine coming in. Photos from Features in this Video Here are some of the photo highlights from my time spent in the greenhouse dome today. Below are some of the seeds we start in the dome this time of year. These crops can be rotated as they are harvested. Rotating is when you harvest and then plant more seeds. Always something new in the Greenhouse Dome Pond. Each day is a learning experience. Tech stuff… Recycle plants from the summer clearance rack and even bricks from 1880 home we owned in town for the greenhouse dome. Santa is spending winter in the dome greenhouse soaking up the sun. Let’s Connect And this is why I am smiling… the dome greenhouse is for sure my high tech She Shed! Sometimes I have a heck of a time thinking of titles for my post. I really believe I am just thinking too hard so stay tuned for fun random REAL life videos coming in 2020. It is my way of saying I am tired of thinking .. dome gardening is fun! What do you think about that? Connect with me on social media links featured on this website or reach out on my contact page. Be Happy,

Oven Air Fryer Roasted Cauliflower Recipe
In this post discover a super-easy way to prepare a healthy veggie: Oven Air Fryer Roasted Cauliflower Recipe. This recipe is using the Air Fryer because it just makes everything so much easier! Oven Air Fryer Roasted Cauliflower Recipe This is the Super Easy to Prepare Roasted Cauliflower in an Oven Air Fryer. Generally, This vegetable is best fresh with my favorite dip however lately I am enjoying this quick ‘fry’ method. Furthermore, I really believe you are going to love this recipe. Suddenly, you will find yourself eating more heathy food – trust me! As a rule, the recipe is tender and yet crispy with a parmesan and herb topping. Besides, you can grow the cauliflower and herbs in your home garden. This Roasted Cauliflower will be your favorite side dish on a whole year-round. Use of the air fryer is the best and only way I recommend to prepare this dish. Scroll to bottom of this page for the complete recipe! This is a recipe I love to use in my Grape Tomato Cauliflower Cake shared on this website as well. Grape Tomato Cauliflower Cake Recipe Remember while cooking in the air fryer it will take less time to cook the food so keep an eye on your first recipes using this appliance. Once you know your machine and how quickly it cooks – look out! Why I love the Air Fryer Oven Ready To Go on Air Fryer Rack Spray Olive Oil on Cauliflower Here is a list of some benefits when cooking with the air fryer and why I personally love it! Less oil (if any) is needed making each meal healthier. The Air Fryer is easy to clean Less energy is needed to run an air fryer. Air fryers take up less space in the kitchen. You will find yourself eating at home more often because the air fryer helps you be creative easily while saving money in your own home kitchen. In conclusion, I love to hear from you with any other reason you may love oven air fryers. Hence, be sure to comment on this post or comment on my social media links on my website. Cauliflower is a great source for magnesium and it is also fun to grow in your home garden. Pin Print Oven Air Fryer Roasted Cauliflower Recipe Recipe by Bren HaasCourse: Side DishCuisine: AmericanDifficulty: EasyServings 8 servingsPrep time 5 minutesBaking Time 7-10 minutes Ingredients 1 medium large cauliflower 1 tablespoon of olive oil herbs for flavoring (fresh or dried seasoning mix) garlic (minced) Directions Cut the cauliflower into bite sized pieces. You can use the majority of the stem for this recipe too. Toss cauliflower, olive oil, garlic and herbs in a bowl until well coated. Place the toppings on the oven air fryer rack being careful to not crowd the vegetable so air can move through the unit. You will most likely use 2 of the racks so be sure they are at least 3 inches from top of the appliance. Bake at 395*F for about 7-10 minutes. About half way through bake time switch positions of the racks. Serve immediately. This Roasted Cauliflower in an Oven Air Fryer Recipe post may contain affiliate links. See my FULL DISCLOSER for further details. Let’s Connect Undoubtedly, you will use this recipe so be sure to comment and let me know how it turns out for you. You can also find more about me on my contact page. Happy Air-Frying,
 
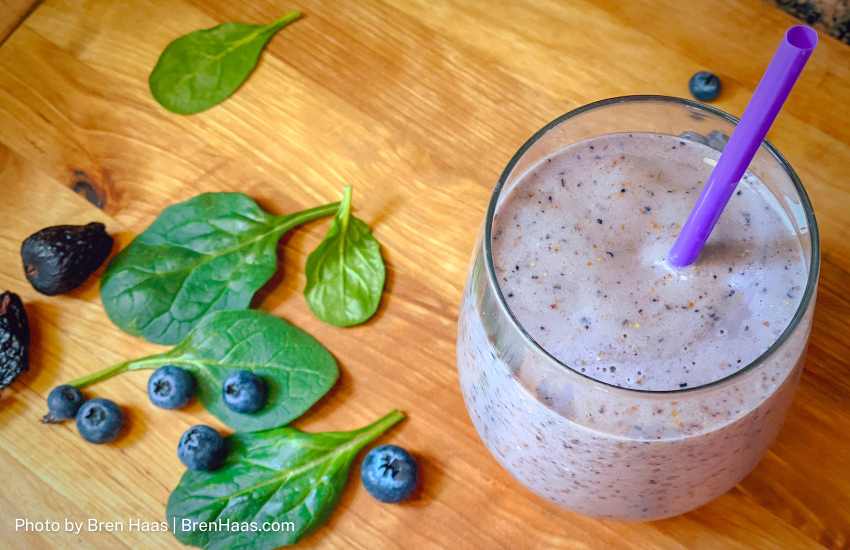
															Thank you for checking out my post today!
Let’s Connect
Hard to believe all that goodness is in such a little seed! I hope you share with me what you thought about this post and if you have any great recipes using flaxseed. Thank you again for checking out my website today.
Here’s to a healthy future,


								